From a Shopify store to a running Shopping funnel
Seven steps, about 45 minutes of your time, and one wait for Google. Every place you need to click is linked from the step that needs it. Do them in order — each one depends on the one before it.
The walkthrough is being recorded
Every step is written out below, with the link to each place you need to click. The video will appear here — the chapters are the same steps.
Chapters
0:00
What you are setting up — Shopify, Merchant Center, Google Ads
1:15
Create your Spagify account
2:30
Get your products into Merchant Center — the Google & YouTube channel
5:30
Connect Shopify to Spagify — the custom app
8:30
Connect Google Ads and Merchant Center
11:00
Check conversion tracking
13:00
Choose what Spagify tells you
14:00
Launch your first Priority Funnel
17:00
The first week — what to watch and what to leave alone
What you are actually setting up
Three accounts have to be talking to each other before an ad can run. Your Shopify catalog feeds Google Merchant Center; Merchant Center is what Google Ads serves Shopping ads from. Spagify reads the first two and runs the third.
If you already advertise on Google Shopping, the first two are done — skip to step 3. Spagify will also read the campaigns and negative keywords you already have and offer to carry them across.
Before you start
You need
- Owner access to your Shopify store, or a staff account with Manage apps and channels. Collaborator accounts cannot do step 3.
- Your .myshopify.com domain — the one in the address bar of your admin, not your customer-facing domain.
- A Google account you are happy to own the ad spend under.
- A card, for Google Ads and for your Spagify trial.
Worth knowing
- Google bills you directly for ad spend. Spagify never holds or moves your ad budget.
- Your Spagify trial runs 21 days. You add a card at step 4; nothing is charged before the trial ends.
- Step 2 has a wait in it — Google's first product sync can take up to 24 hours. Start it first if you want to do this in one sitting.
- Everything Spagify asks Google for is listed on the permissions page.
Step 1
2 minutes
Create your Spagify account
- Sign up with the email you want the alerts to reach. If you have an early access code, it goes in on this screen.
- Confirm your name and give the workspace a name — usually your store's. This is what appears on every alert and summary.
- You land in the setup wizard. Leave it open; the next steps happen in other tabs and you will come back to it.
Step 2
10 minutes, then up to 24 hours of syncing
Get your products into Merchant Center
Google Shopping ads serve from a Merchant Center product feed, not from your Shopify catalog directly. Spagify advertises what is in that feed — it does not create it. Already have a feed? Note which Merchant Center account holds it and go to step 3.
- In your Shopify admin, install the free Google & YouTube channel (published by Google). Any feed app you already trust works just as well.
- Connect it to your Google account and either pick your existing Merchant Center account or let it create one.
- In Merchant Center, fill in shipping, returns and tax settings. Offers are disapproved wholesale without them, and a disapproved offer cannot be advertised by anyone.
- Wait for the sync, then open Products in Merchant Center and confirm your items read Active. Anything else, open Diagnostics — it names the field to fix.
Step 3
10 minutes
Connect Shopify to Spagify
Spagify reads your catalog, your stock levels and your paid orders. It makes one write, and only one: a URL redirect when a product handle changes, so the link Merchant Center holds keeps landing on the product instead of a 404.
- The Connect Shopify step of the Spagify wizard lists every value you have to enter in Shopify next to a copy button, with links straight to your admin and the Dev Dashboard. Type your store domain at the top first, so the admin link opens your own store. Leave the tab open.
- In a second tab, open your Shopify admin and go to Settings → Apps → Develop apps → Build apps in Dev Dashboard.
- Create an app, give it the scopes read_products, read_inventory, read_orders, write_url_redirects — copy them from the step rather than retyping, since a mistyped scope only fails at the end — then release the version and install it on your store.
- Copy the Client ID and Client secret from the app's Settings → Credentials, paste both under Paste them here on the same step, and click Connect. Pasting the whole admin URL into the domain field at the top works — it is rewritten to the domain for you.
- Open Products in Spagify. A catalog under 10,000 SKUs fills in a minute or two; larger ones take up to ten.
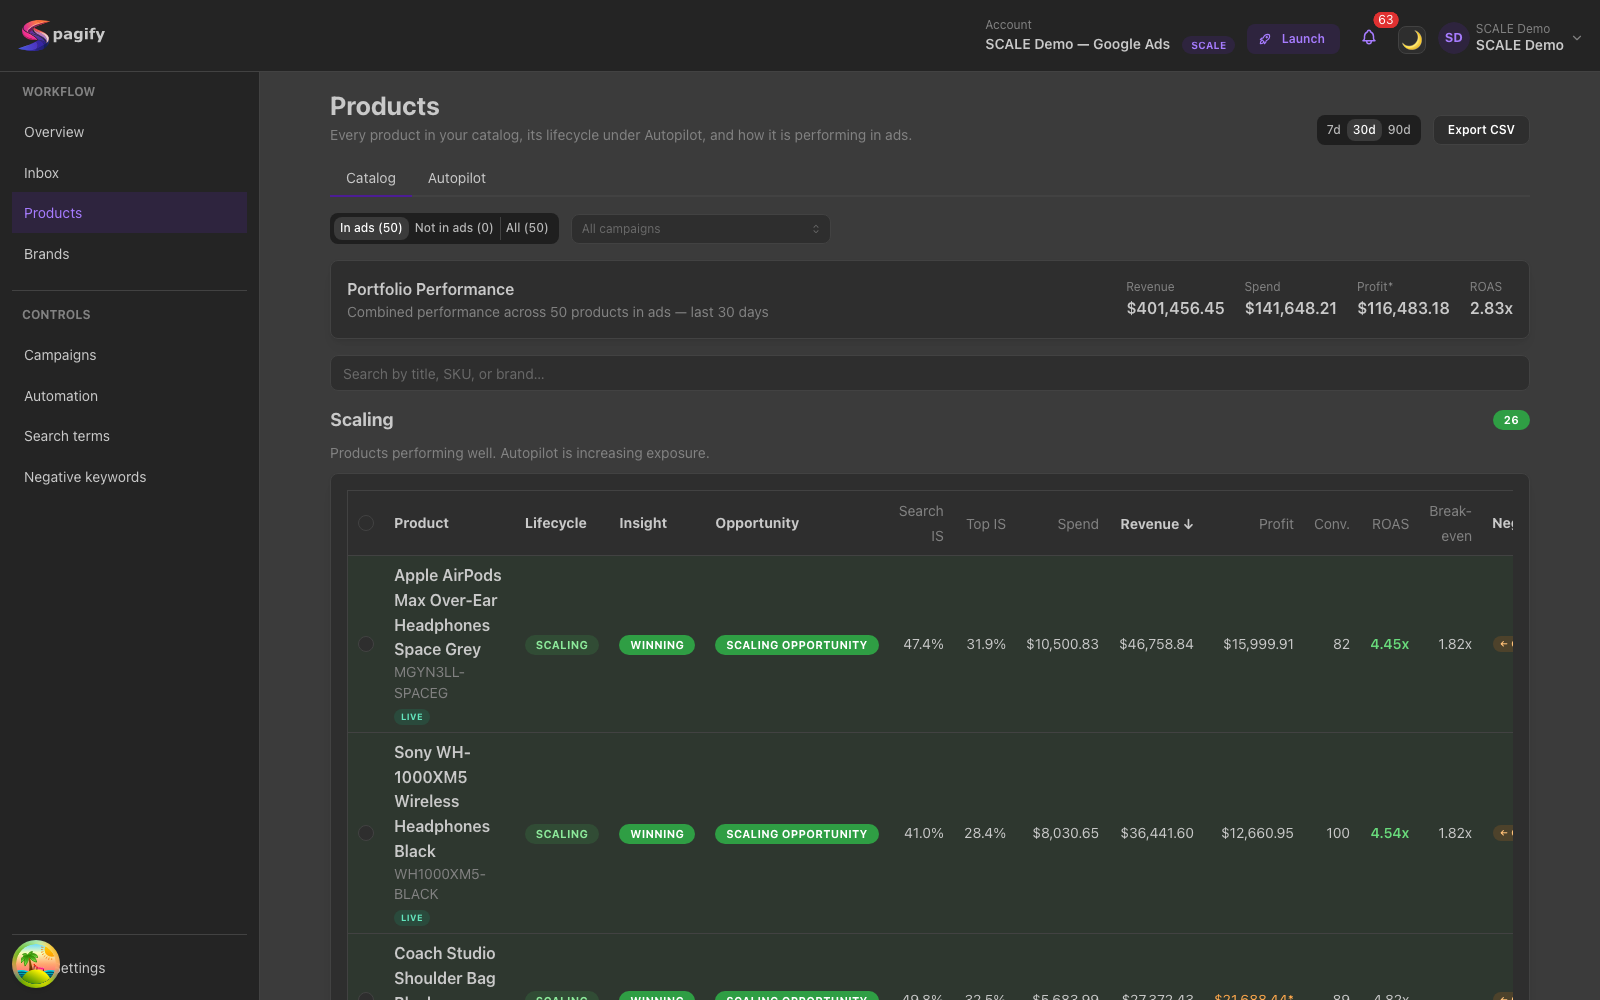
Your catalog in Spagify once the sync lands — every product, its stock and how it is performing.
Step 4
5 minutes
Connect Google Ads and Merchant Center
One Google sign-in covers both. Spagify discovers the accounts you already have access to — there is no Customer ID or manager account to set up by hand.
- Pick a plan and add a card. This starts the 21-day trial; nothing is charged until it ends, and you can cancel before then.
- Click Connect with Google and grant the two scopes Spagify asks for.
- Choose the Google Ads account to manage. Manager (MCC) accounts are hidden — Shopping campaigns only run in advertiser accounts.
- Choose the Merchant Center account holding the feed from step 2. Spagify sends the account link to Google Ads and accepts it for you.
Step 5
5 minutes
Check conversion tracking
Spagify moves bids toward what each product actually earns, so it needs Google Ads to see your sales. Do not skip this one — without conversions every product looks identical and the bidding has nothing to aim at.
- In Google Ads, open Goals → Conversions. You want an enabled Purchase action that reads Recording conversions. If the Google & YouTube channel set one up in step 2, you are done here.
- If there is none, open Settings → Integrations → Google Ads in Spagify and click Create Purchase action. Spagify then shows you the two snippets to install.
- Put the global site tag in your theme's <head>, and the event snippet on your checkout — Shopify Settings → Customer events → Add custom pixel on a store using checkout extensibility, or Settings → Checkout → Order status page additional scripts on an older one.
- Turn on Enhanced conversions in the same Spagify card. It recovers the sales the browser tag misses.
Spagify also uploads your Shopify paid orders to Google Ads as offline conversions, matched on the click id, so revenue still lands when a tag does not fire. That is a backstop, not a replacement — set up the tag.
Step 6
2 minutes
Choose what Spagify tells you
Every notification starts switched off. The wizard asks you once; you can change it whenever you like, per person on the team.
- Daily review — what Spagify changed yesterday and why. The one most merchants keep.
- Critical alerts — offers disapproved, a funnel out of budget, a connection that needs reconnecting. Things that stop ads serving.
- Weekly performance report — Monday morning: cost, impressions, clicks, CTR, CPC, orders, revenue and ROAS against the week before.
Step 7
10 minutes
Launch your first Priority Funnel
A Priority Funnel is three Shopping campaigns built together, sharing one budget, with one ad group per product. The three tiers exist so a shopper who knows exactly what they want is not paying the same as a shopper who is browsing.
- Open Launch and pick your products: filter by brand or category, then tick the exact ones under Choose products. Start with in-stock items that already sell — 10 to 30 is a good first funnel. Spagify can also propose a set from the campaigns you already run.
- Set one daily budget for the funnel. All three campaigns draw from it. Spagify suggests a range from the prices of what you picked.
- Choose where the ads serve, and leave presence on people in my targeted locations unless you have a reason not to.
- Pick a bid tier. Spagify only offers the bid strategies Google will currently accept for the account, so an option missing here is Google's rule, not ours.
- Leave Pause existing campaigns on. Two live campaigns for the same product is a bid war with yourself.
- Preview, then launch. Campaigns are created, the products are partitioned one per ad group, the routing negatives go on, and the funnel starts serving.
The first week
From here Spagify checks your campaigns every hour. The most useful thing you can do in week one is let it gather data.
What happens on its own
- Bids move toward what each product earns, inside your budget.
- Search terms that spend without selling become negative keywords, on the right campaign, in the right tier.
- Products that go out of stock or get disapproved are paused, and resumed when they recover.
- Overlap with an existing Performance Max campaign is reported, naming the products.
- A daily email tells you everything that changed.
What to expect, and when
- A few hours — first impressions, once Google finishes reviewing the new campaigns.
- Day 1–2 — the first search terms arrive and the negative keyword work starts.
- Day 3–7 — enough clicks for the bidding to have an opinion. Resist changing bids by hand before this.
- Anything urgent lands as an alert with what happened, why, and what to do about it.
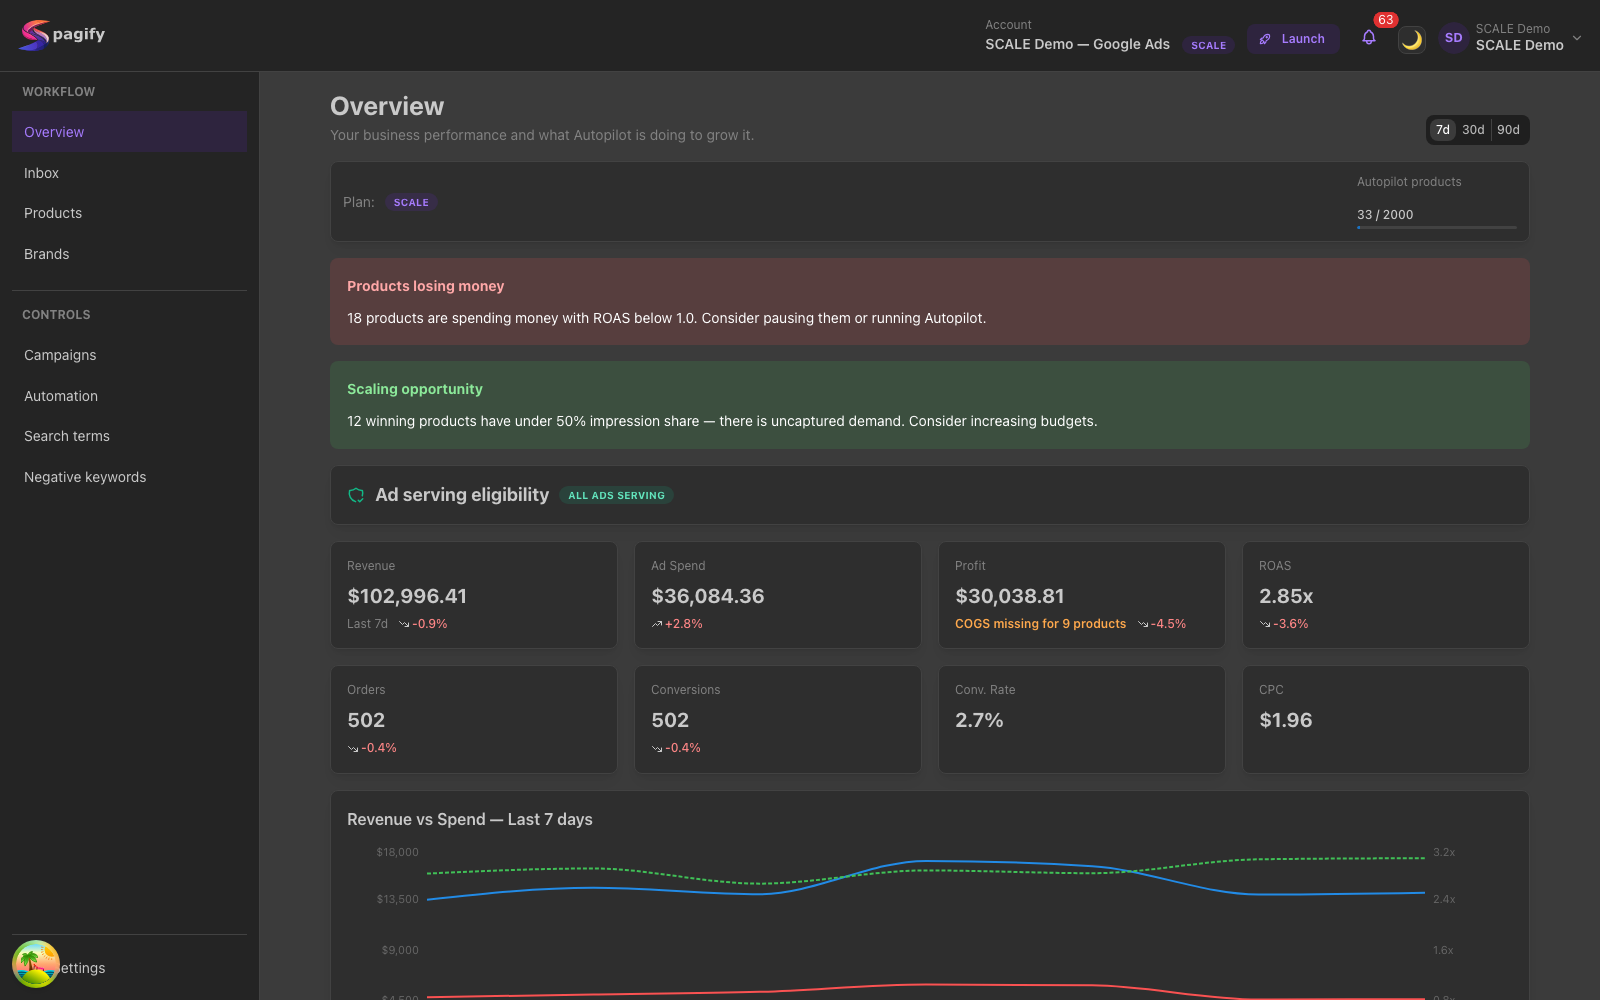
Overview: what the funnel is spending and earning, and what needs you.
If something is stuck
Stuck on a step?
Reply to any Spagify email and a person reads it, or write to support@spagify.com. Tell us which step and what you see.

Spagify
The Standard Shopping SPAG operating system for Shopify.
© 2026 Spagify. All rights reserved.
Spagify — The Standard Shopping SPAG operating system for Shopify.